Previous Posts

Thursday 31 January 2013

XB2002 - Spaceship Interiors Research

After creating some modular assets within 3DS Max and extracting them to UDK to create structures we were then tasked with creating our own hand painted texture sheet from which we would then create modular assets from.

I began looking at spaceship interiors from multiple different franchises and IPs and being a huge Star Wars fan I of course looked at ships such as the rebel blockade runner and other ships for inspiration.


I really like the curvature of the walls as they seem a bit more original than the usual angular boring walls and corridors that most sci-fi spaceships would have.


I then also looked at some other references from Battlestar Galactica which has more of an older militaristic, industrial feel to it.


Totally having lights along my walls


Having looked at all these images I think I will take a little something from all of them (some more than others) whilst avoiding having completely dull boring wall pieces

XB2002 - Modular Assets

For this task we had to create modular assets that would be usable within UDK, so that we effectively made the parts for the building such as a wall or a window or a pillar and then pieced them all together to make a building within UDK.

We first created a texture sheet that had windows and walls etc from a photo of a building. Below is the building I chose, which was an interesting task as I had to do a lot of photo editing as the texture sheet couldn't have shadows on it.

Chosen Building

Once the texture sheet was made we then used a grid set up to align all the textures which we then repeated using the same grid technique through 3DS Max and UDK so that everything aligned perfectly.

Extruded Texture Map in 3DS Max
We then extruded the parts out of each piece to make them 3D and rearranged any UVs on the side so that there was no texture stretching. Once the 3D model was fine and there was no more errors I then exported them into UDK and began building.


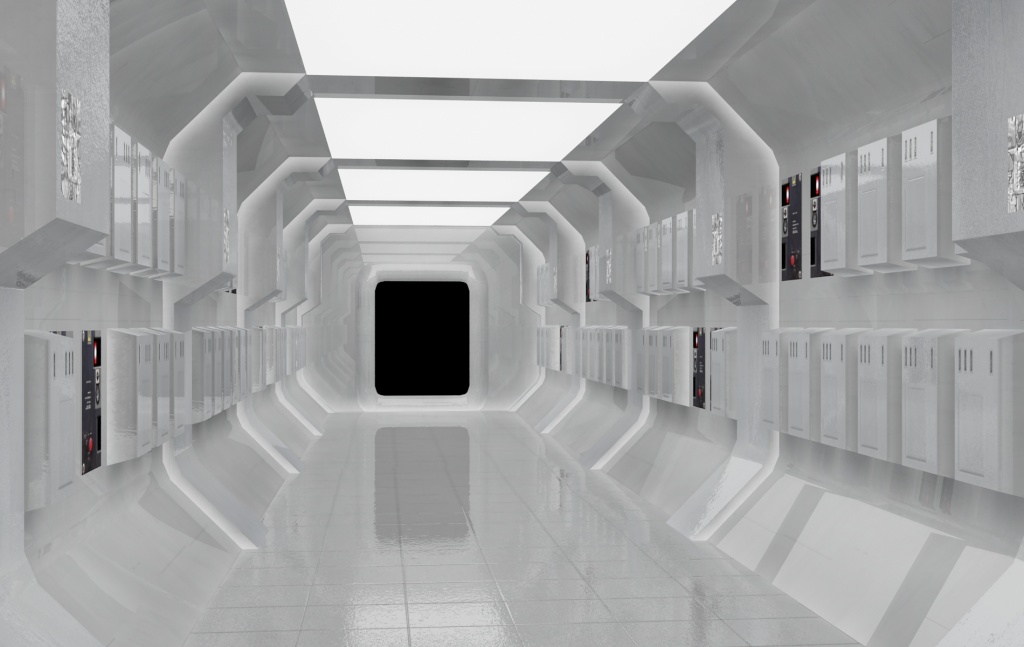
Although it was done terribly as it is very obvious that they are modular assets and the same static meshes were copy and pasted everywhere I still thoroughly enjoyed using this technique as it was very quick and easy to create a more complicated structure.


Part of the reason why the finished building didn't look so great was due to the fact that I didn't successfully align the static meshes together so there is either texture overlapping or else gaps between the models which is something I now know to avoid.


Overall I was very happy with what I learnt and I thoroughly look forward to creating some more modular assets using a better texture sheet and aligning things properly.

Monday 21 January 2013

XB2178 - Tank Modeling Cont.


The last iteration of the tank I felt was a little weak in my opinion and whilst looking at the silhouette weakness was the last thing I thought of as the tank had a good sense of 'beefiness' and so I joined the 2 side parts together to give it a larger hull. However now I have the problem of the turret not being able to go down all that much, additionally I have to bare in mind that there is meant to be a sense of stylisation to this tank as well. Enlarging the turret could possibly solve both these problems however it does look a bit silly really.


I then decided to solve the problem regarding the turret by lowering the main tank body down a bit which definitely seemed to improve the distance. Also I'm beginning to like the thought that the tank turret could be an anti-air turret and that its other armaments are just self defense weapons or for ground targets.


Below is a render of my tank at its current stage, compete with a backdrop that doesn't really work but oh well. You can see that I followed the tank's silhouette and gave it side sponsoon weapons and I also felt it necessary that the driver's little vision slit should be moved forward a bit to give a better range of vision since there's a large barrel on his left.


Initially I felt that this 3D model would just be the rough model and I would make another one from scratch baring a better mind for polycount and taking more care, however due to time constraints I think I will just keep working into it and improve it as I go along

Wednesday 16 January 2013

DD2000 - Task: Cards

For this task we had to choose between snap, war, or 21, and we had to then state the operational rules, the constitutive rules, the implied rules and come up with some additional rules that could be used to edit the game slightly but not too much. The game we chose was 21.


Operational Rules


  • At the start of the game each player is dealt two cards (Including the Dealer).

  • Each player has an independent game with the dealer, with the objective to beat the dealer.

  • Player's turn is finished when they decide to 'stand' or if they exceed 21 and go 'bust'.

  • Dealer must continue to 'hit' until the minimum value of 17 is reached.

  • If both player and dealer go bust, the dealer still wins.

  • If both player and dealer draw it is classed as a draw or a 'push'.

Constitutive Rules
 
• The player can only have 5 cards at once or the game will end

 
• A game of 21 technical last one round unless agreed upon more

 
• Dealer busts everyone wins

 
• Played with a standard 52 card deck excluding jokers

 
• If 2 or more players have same highest total player with the least amount of cards wins


Implied Rules

• No cheating

• Don’t lie about what cards you have

• Don’t deliberately miscount what cards you have.

• Don’t try and hide your cards (placing one on top the other)

• Don’t show your cards to other people

• Don’t try and peek at other people’s cards

• No distractions


Additional Rules

  •  When all players bust they face each other in a elimination round the winner then faces the dealer.
  • Players can choose to get three random cards after the dealer has shuffled the deck rather than hit to gain a third
  • Player can save 2 cards and choose to swap to them if their hand is is a bust

Monday 14 January 2013

XB2178 - Tank Modelling

With the chosen silhouette as a template I opened 3DS Max and began to quickly model it out with the aim of getting a better understanding of what my tank looks like.


I found that after this first iteration of the tank model that it looks different as to what I would have imagined. I can't help but feel that it maybe should have looked a bit beefier or a bit bigger or even aggressive as the front view is quite flat, though that could be down to the fact that it is a very basic model.

So at this current point in time I'm looking to discover what the actual front and back of the tank will look having gotten the side mostly done although I suspect I may move the main turret back a bit more possibly in the next iteration.

XB2178 - Silhouettes

As I have little direction and I'm not entirely sure which direction I should take I've created some quick silhouettes to try and nail down which way I should go about designing the tank, whether I want to design a very aggressive looking tank or a more passive tank.

After quickly pumping out 10 real quick silhouettes I then decided to look at what different aspects and features I really liked and what I'd like to incorporate into the final design.


I quite liked the main body of the tank turret of 1. as it gives a sense that there's a pivot in there but also because of personal preference, I like it. Wasn't a fan of there being 2 turrets however on tank 2. although I really loved the quad cannon look on 3. (so maybe my tank can be an anti-air tank?) but I maybe even loved the little rungs along the tank body even more as it really seems to flesh it out and adds a good bit of detail. Looking at the general shape of tank 5. gives it a very aggressive look and I really do like the thought of a tank with big treads. additionally I also like the look of side-sponsoon weapons seen on 5. and 9. although that maybe would be a bit overkill.

Final Design?

After combining all of what I liked from all my silhouettes I am left with this monstrosity, which I really do love the look of it and I think it's a great silhouette with quite an interesting look. I may have given it a bit too many weapons, though a tank brimming with weapons also has a tendency to look pretty cool..


Additionally I might move the turret a little bit further back, this is something I can easily experiment with in 3D and eyeball at a later stage if I need to.

Saturday 5 January 2013

XB2002 - Robot Textured and Finished

Next I had to texture the Robot so that it would look similar to the original with the Marine colour pattern of green with tan.


I felt that it came out very very well and I am very happy with it as it resembles the original very well. The ambient occlusion maps were very helpful marking out areas of intersecting objects and where shadow or rust or grease should go however they were also very frustrating at times as they would darken areas to the point where the texture was nearly completely black and no detail could be seen and so they had to be mostly removed all together.

Additionally I found the use of normal maps to be extremely useful here as before I had a much higher poly-ed model and had to cut down on them, but I was able to preserve some of the detail using the normal maps. Although rather than creating normal maps from the slightly higher poly-ed I thought it best to create normal maps from the textures. This allowed me to achieve more detail as I was then using a normal map to show a circle indent rather than a nanogon indent.

With the robot modeled and textured I then just needed to model and texture his shotgun, which I was the main reason why I chose this robot so i really wanted to have a lot of detail on the shotgun, especially since it did not account to the poly limit we had.


I loved how the shotgun turned out as I felt that it looked really good and gritty and that it matched the same colour pattern of the robot. I had a lot of fun modelling this shotgun and it was an absolute delight to model after having to model a robot with a limitation.

With that I then just needed to create normal maps from the textures and apply them to the models and then I was done.

Body Unwrap
Normal Map of Body Unwrap
Hands and Backpack Unwrap

Normal Map of Hands and Backpack Unwrap   
Legs and Feet Unwrap
Normal Map of Legs and Feet Unwrap
Arms and Joint Unwrap
Normal Map of Arms and Joint Unwrap